Hello! I am Rayner Lim, a Computer Science student at the National University of Singapore. I design and code, and am passionate about building great products, services & systems. Here you can find my contributions to one of my projects.
Overview
My team and I were tasked with enhancing a basic address book desktop application with a command line interface (CLI) for our Software Engineering project. We decided to morph it into an integrated bookmark manager and web feed aggregator called README.
This product helps heavy web content consumers read more productively, efficiently and comfortably by keeping everything they want to read in one place, with powerful organization options, offline support, web feed aggregation and a reading view mode as key features.
Users interact with it using a command line interface (CLI), and it has a graphical user interface (GUI) created with JavaFX. It is written in Java, and has about 10,000 lines of code.
My role was to design and implement the Reader View feature, which gives users a better reading experience, as well as the user interface (UI). The following sections illustrate these enhancements in more detail, as well as the relevant sections I have added to the user and developer guides in relation to these enhancements.
Summary of contributions
-
Major enhancement: I added the Reader View feature
-
What it does: The Reader View provides a clean, minimalist reading experience by stripping out all the visual clutter from web pages and presents content in a perfectly formatted, clean layout, with user-selectable colour schemes.
-
Justification: This feature improves the user experience significantly because it lets users focus on consuming content without any unnecessary distractions and helps them read more comfortably, thus improving productivity.
-
Highlights: This enhancement required analysis of design alternatives to open it up for usage in as many scenarios as possible. The implementation was challenging as it required managing complex state. It also required an in-depth understanding of the JavaFX WebView component, as well as knowledge of the HTML Document Object Model and CSS styling.
-
Credits: The Readability4J library does the heavy lifting of extracting a web page‘s relevant content and removing clutter from it. I used the Jsoup library to extract additional useful metadata, and combined this with the results from Readability4J into a new web page, where I used the Bootstrap framework to layout content and adapted the Bootswatch Litera theme into different colour schemes for presenting content.
-
-
Minor enhancement: I added a navigation sidebar UI component that helps users create a mental model of the app structure, and also offers convenient access to the major areas of the app. This required modifying the existing design to decouple displaying of command results from user-entered commands. It also supports asynchronous commands in future that can return an initial result first, do some long-running work, and then return another final result.
-
Minor enhancement: I added an autofill utility that lets users specify just a link when adding a new entry and have the title and description fields automatically filled. This makes adding links to our appvery convenient for users.
-
Code contributed:
-
Other contributions:
-
Project management:
-
There were a total of 5 releases, from version
1.1to1.4. I managed releasev1.2on GitHub.
-
-
Enhancements to existing features:
-
Documentation:
-
Community:
-
Tools:
-
Contributions to the User Guide
Given below are sections I contributed to the User Guide. They showcase my ability to write documentation targeting end-users. |
Changing the view mode: view
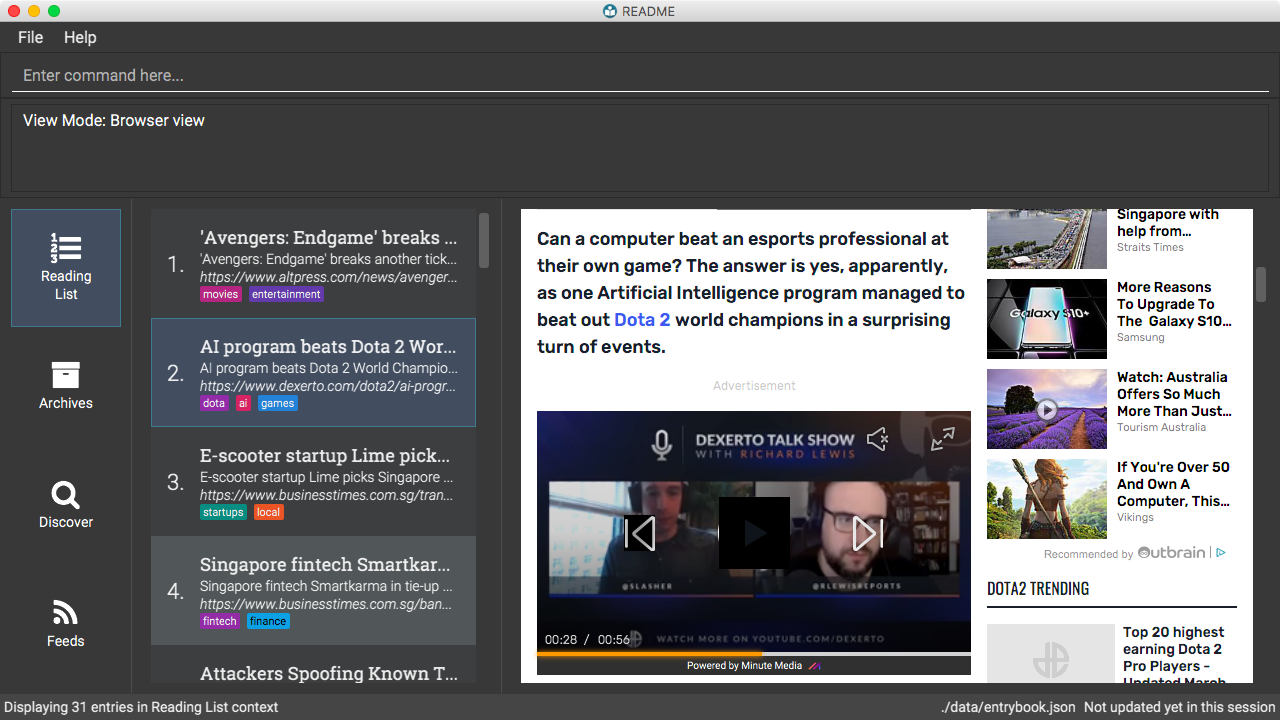
Changes the view mode between the original browser view or the reader view for a more comfortable reading experience.
Format: view MODE(browser, reader) [s/STYLE(default, sepia, dark, black)]
Examples:
-
Switch to the browser view mode, which displays web pages as they would appear in a web browser.
-
view browser
-
-
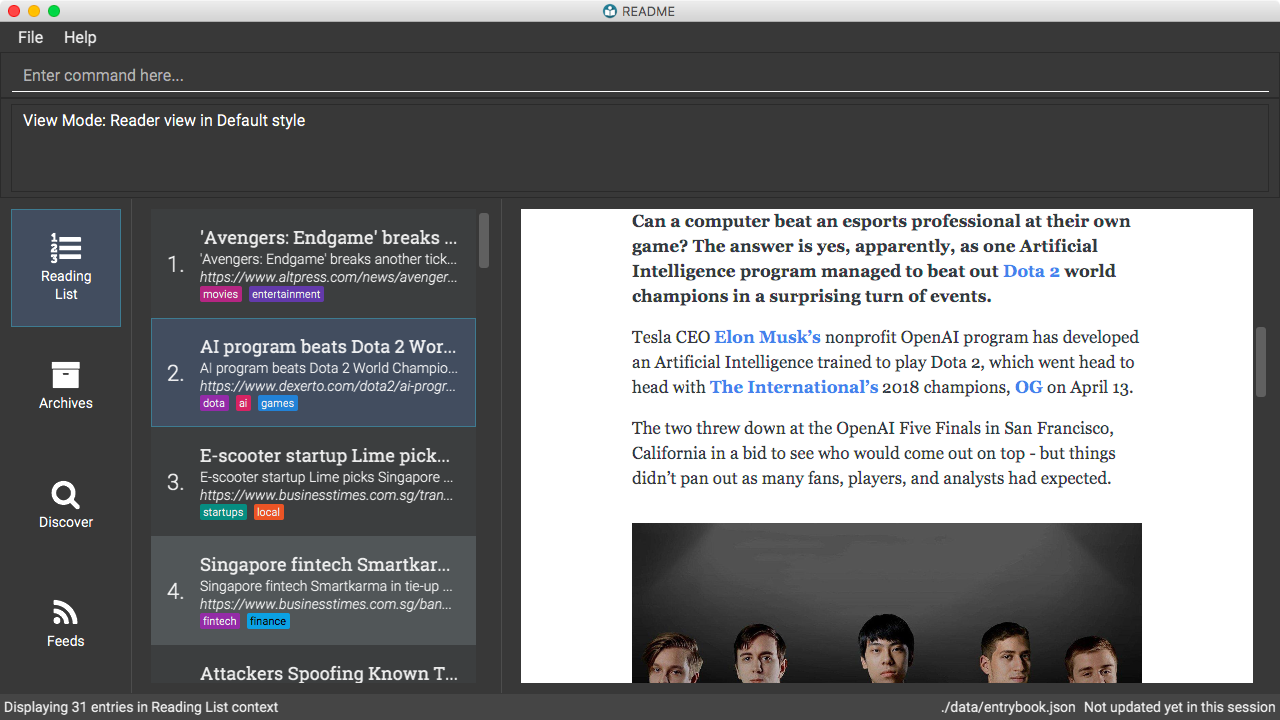
Switch to the reader view mode, which strips away clutter and presents content in a clean layout.
-
view reader
-
-
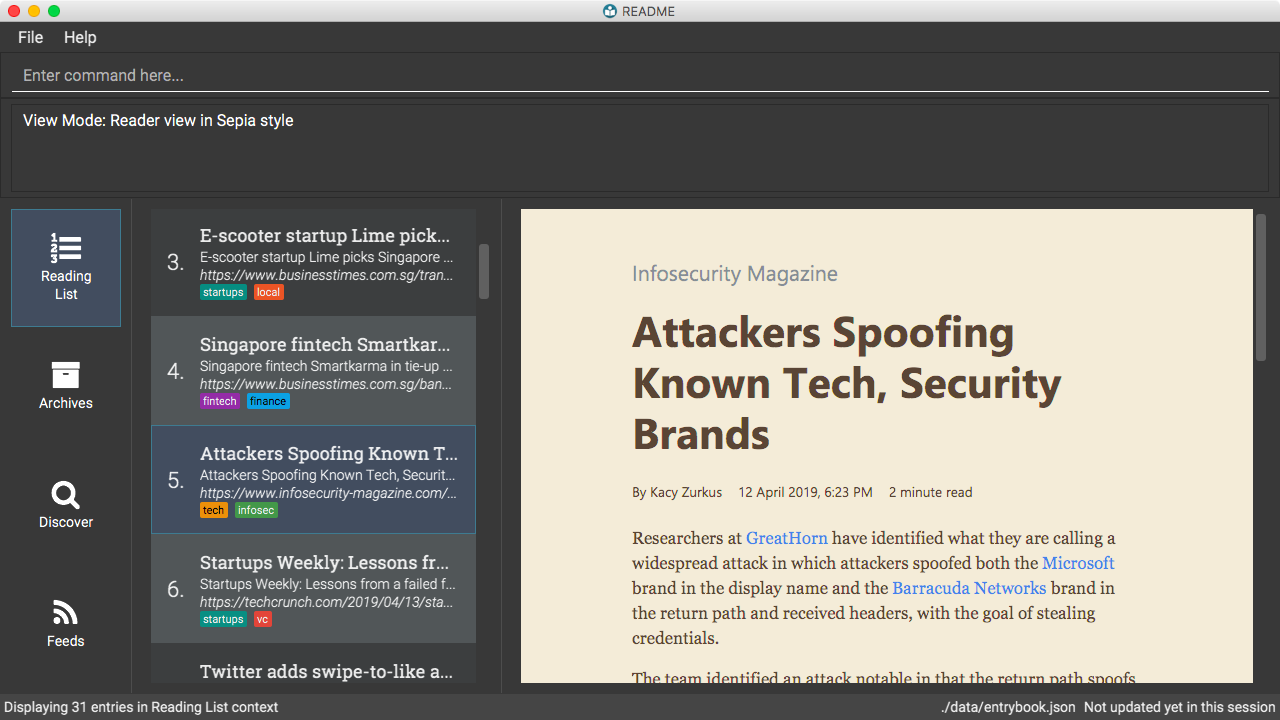
Switch to the reader view mode with sepia colour scheme
-
view reader s/sepia
-
-
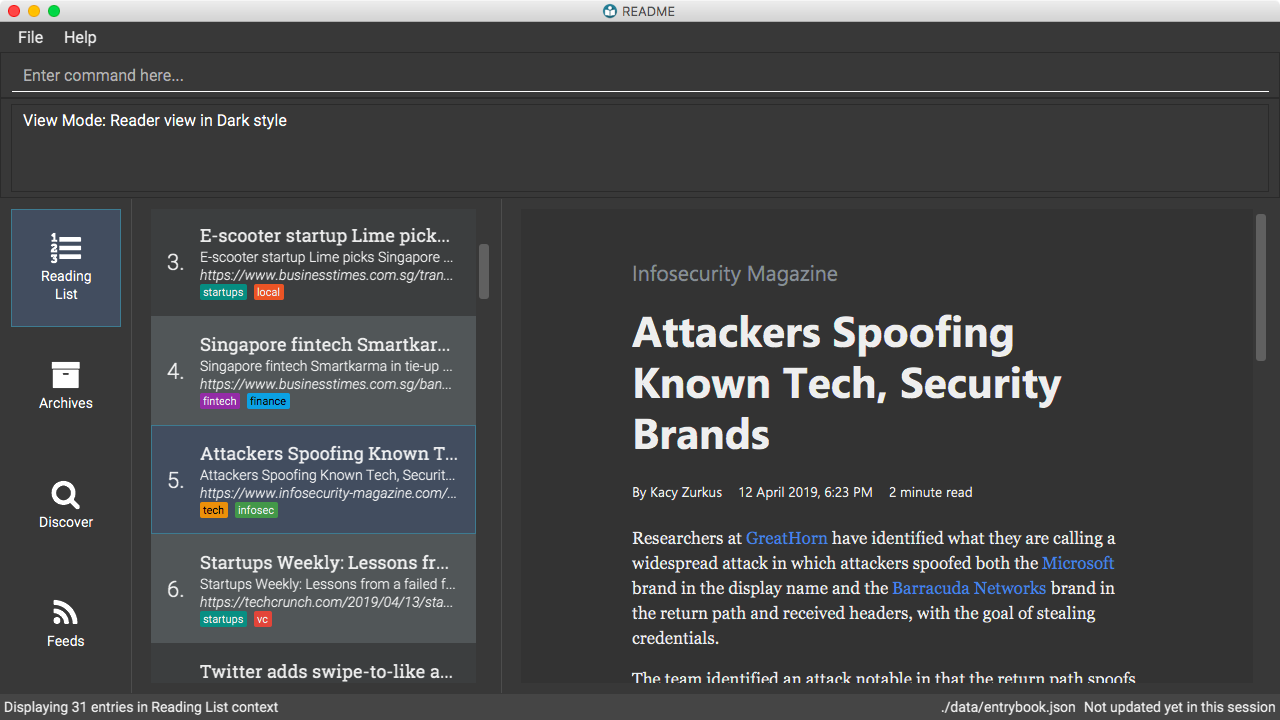
Switch to the reader view mode with dark colour scheme
-
view reader s/dark
-
-
Switch to the reader view mode with black colour scheme
-
view reader s/black
-

Features
Overview
Link Saving and Management - Read Anything
README helps you capture the content that you discover online.
Save the latest news stories, magazine articles, recipes, how-tos – anything you discover online. Whenever you find a web page you want to read later, add it to your reading list in README. To help you organize the mountain of content, README lets you tag link so you can always find what you’re looking for, and archive or delete links you’ve finished reading so your reading list won’t become cluttered.
Web Feeds Subscription - Read More
README keeps you up to date with your favourite websites.
Integrations with Bing Web Search and Google News mean you’ll never run out of things to read. Search for particular topics you’d like to know more about or just read the top news stories - it’s up to you. As README also functions as a feed reader, you can subscribe and unsubscribe from any RSS or Atom feed available on the Internet. Whenever you open README, the latest content from your subscribed feeds is automatically added to your reading list.
Offline Support - Read Anywhere
README lets you read offline, even on airplanes, trains, or on Wi-Fi-only devices away from Internet connections.
Whenever you save a link, README automatically downloads its web page to your personal computer if there is an Internet connection. This gives you the convenience of viewing your saved links anywhere, anytime, even if there is no Internet connection. If you still want to keep a link but no longer need to view it offline, you can archive it. This will delete its downloaded web page from your personal computer.
Reader View - Read Better
README makes your long reading sessions so much more comfortable.
Reader View strips out all the visual clutter from web pages and presents content in a perfectly formatted, clean layout, so you can focus on the content without any unnecessary distractions. You can even choose the colour scheme that suits you best - try the white or sepia style if you’re reading in a lighted environment, or the dark or black styles in a dark environment.
Glossary
Common Terms
-
Feed
A data format used by content providers to provide users with frequently updated content. Also known as a web feed, they can be found all over the web - you can usually find a link to them titled "RSS feed" or "Atom feed" at the footer of a website. -
Link
Short for "hyperlink", a reference to a URL you can follow by clicking on its text. -
Tag
A label attached to an entry for the purpose of identification or to give other information. -
URL
An address to a web resource, usually beginning withhttp://orhttps://. Stands for Uniform Resource Locator.
README-specific Terms
-
Command
An instruction you type in that makes README perform a function. -
Entry
The name we use for a single web page that has been added to README. Similar to a bookmark, comprising URL, Title, and Description fields among others. -
Context
The Context determines which Entries are displayed and what Commands are available. The four contexts are Reading List, Archives, Search Results and Feeds. Refer to [Context] for more information. -
Reading List
When you or a web feed that you Subscribe to Adds a new Entry, it is saved to your Reading List. Entries in your Reading List have their web pages automatically downloaded onto your personal computer for offline viewing. When you’re finished with an Entry, you can move it to your Archives for safekeeping. -
Archives
When you’re finished with an Entry but would like to keep it for future reference, you can move it to the Archives. Archived items will still be available for viewing but will not have their web pages automatically downloaded to your personal computer. Therefore, you’ll need an Internet connection to view Entries in your Archives. -
Search Results
When you Search online for new Entries, they are temporarily stored here until you do another Search. You can Add an Entry from here to your Reading List. -
Feeds
Feeds you Subscribe to are listed here. You can Subscribe to a new Feed or Unsubscribe from an existing one. -
Add
The action of adding a web page as an Entry to your Reading List. Sometimes we may refer to this as Saving as well. -
Edit
If you would like to change the URL, Title, or Description fields or Tags of an Entry, you can Edit it. -
Archive
If you’re finished with an Entry but would like to keep it for future reference, you can Archive it. This will move the Entry from your Reading List to your Archives. Archived Entries can be Unarchived. -
Unarchive
If you’ve Archived an Entry but would like its web page to be downloaded to your personal computer, you can Unarchive it. This will move the Entry from your Archives to your Reading List. Unarchived Entries can be Archived again. -
Delete
If you do not wish to keep an Entry, you can Delete it. This will permanently remove an Entry. Deleted Entries cannot be recovered. -
Find
The action of finding certain existing Entries. You can narrow down to those that contain certain keywords. -
Select
If you would like to view an Entry’s web page, you can Select it. You can also choose a View Mode. -
View Mode
The View Mode determines how an Entry’s web page is displayed. The two available View Modes are Reader View and Browser View. -
Reader View
Reader View displays a web page in a simplified layout that makes reading enjoyable and free of distracting ads, fancy layouts, and other extraneous things. You can customize the colour scheme to meet your own preferences. -
Browser View
Browser View displays a web page just as it would appear in its original form in your web browser. -
Search
The action of searching online for new Entries to Add. You can use Bing Web Search or Google News Search. -
Subscribe (to a website’s Feed)
Keep up to date with a website by having any new Entries added to your Reading List. -
Unsubscribe (from a website’s Feed)
Stop adding any new Entries from the website to your Reading List.
Contributions to the Developer Guide
Given below are sections I contributed to the Developer Guide. They showcase my ability to write technical documentation and the technical depth of my contributions to the project. |
Reader view mode
The reader view gives users a more focused reading experience by removing clutter and formatting content into a clean and easy-to-read layout. Letting users choose a colour scheme that fits their lighting environment also makes their reading experience more comfortable.
Using the view command, users can switch between the browser and reader view modes, as well as choose a colour scheme using the optional s/STYLE parameter.
Current Implementation
Available view types are specified in the ViewType enum, and available reader view styles are specified in the ReaderViewStyle enum.
The ViewMode object encapsulates a ViewType and ReaderViewStyle and represents a user setting.
The Model exposes an observable viewModeProperty, which is set by ViewModeCommand and observed by BrowserPanel.
The BrowserPanel is a wrapper around the JavaFX WebView component, and is responsible for displaying web pages.
It keeps track of whether an internal page, offline page, online page or HTML content is loaded,
and reacts to events like changes in loading status, view mode and selected entry.
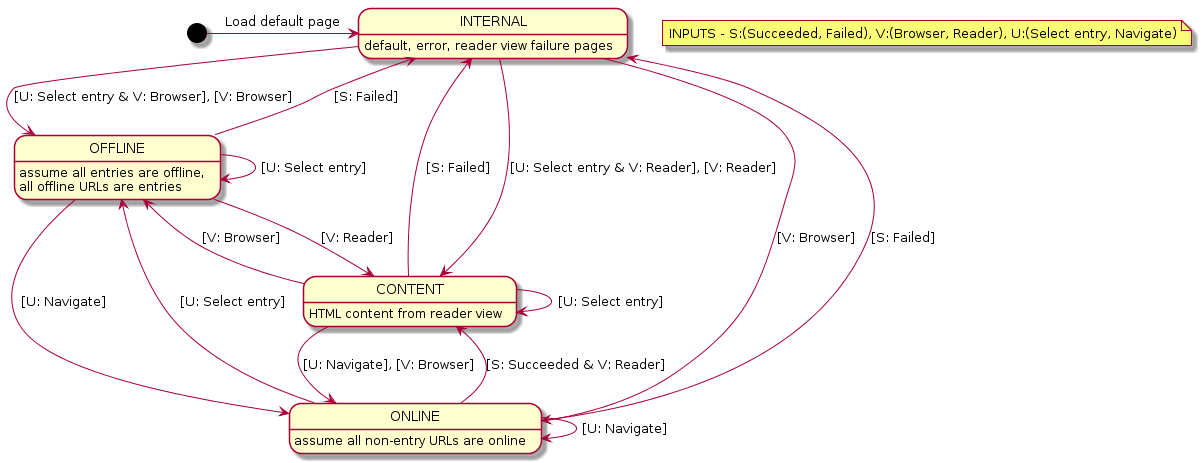
There are two conditions which cause reader view to be generated and loaded:
-
If an original web page has successfully loaded but the
readerview mode is selected, the reader view is generated from the currently displayed page and loaded, then the CSS stylesheet is changed. This mechanism is used for online URLs, and was chosen because using the other mechanism below would cause a performance bottleneck due to having to download online web pages.
-
Alternatively, if the
readerview mode is already selected and an offline URL is selected (most probably an entry), the reader view is generated from directly reading the file pointed to by the offline URL and loaded, then the CSS stylesheet is changed. This mechanism is used for offline URLs, and is a performance enhancement as it bypasses waiting for the original web page to load before reader view is loaded.

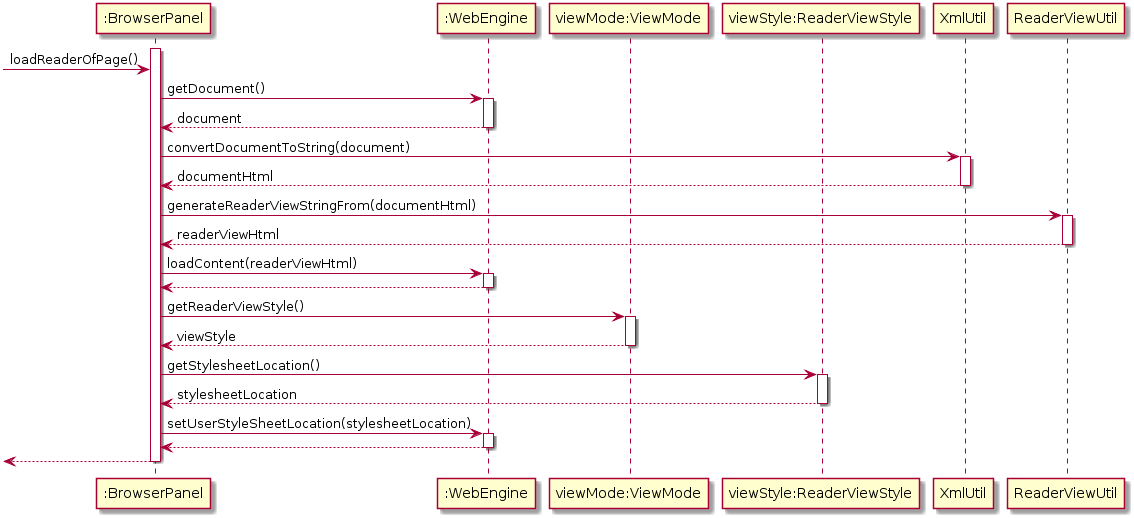
The Jsoup and Readability4J external libraries do the heavy lifting of parsing the raw HTML currently loaded in the WebView to extract useful metadata and content.
Jsoup was chosen as it is a mature HTML parser library while Readability4J was chosen as it is a port of port of Mozilla’s excellent Readability.js.
These are combined into a new HTML document, which is styled using Bootstrap and then loaded in the WebView.
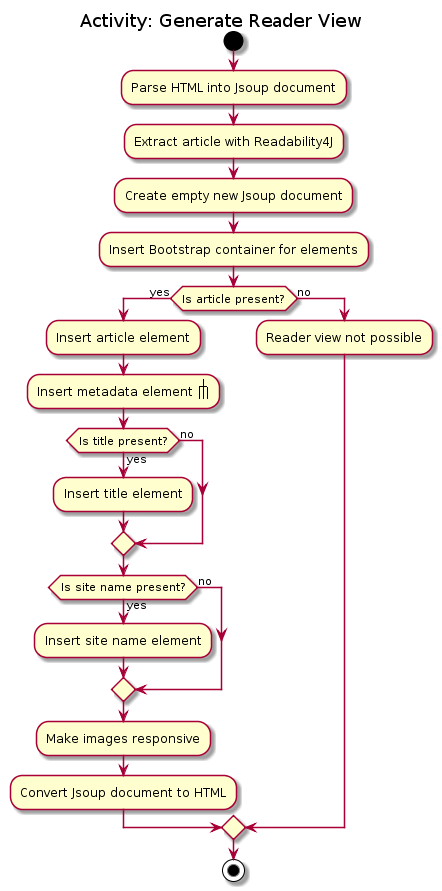
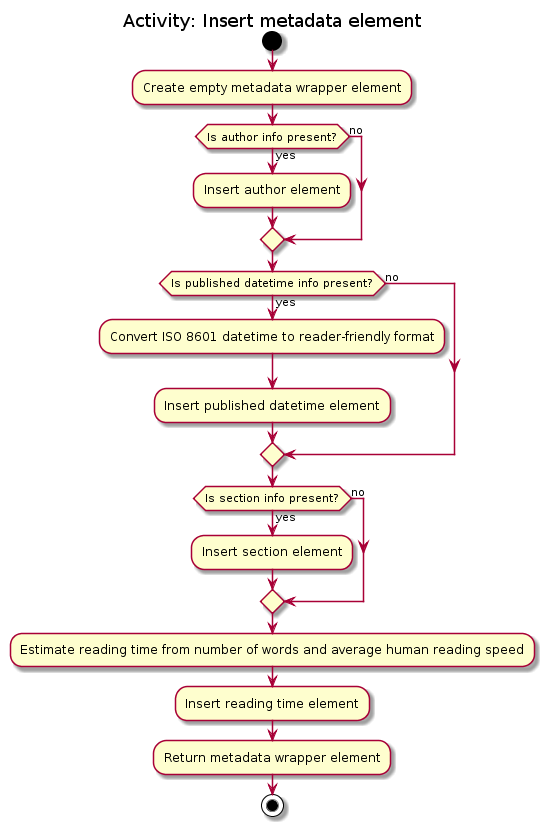
As Readability4J does not extract all available and useful metadata information, Jsoup is used to manually extract author information, as well as Open Graph metadata like published datetime and section information if available. As Readability4J also does not provide the estimated reading time, Jsoup is used to extract text content from the HTML DOM Document Object, and reading time is estimated from the number of words present and the average human reading speed.
Design Considerations
Aspect: When reader view should be generated
-
Alternative 1 (current choice): Generate reader view on-the-fly from the currently loaded web page.
-
Pros: More flexible in the situations it can be used, will use less disk space.
-
Cons: May have performance issues because it needs to be generated again every time, more difficult to implement.
-
-
Alternative 2: When adding a link, generate reader view and save it to disk.
-
Pros: Easier to implement, better performance as reader view is only generated only once for each link.
-
Cons: Will save redundant data and use more disk space.
-
-
Why current choice:
-
Since users might be browsing the Internet using our application’s online search features, it is not practical to download and save every page when users are likely to be at a particular page only for a short time. Therefore, generating reader view on-the-fly will open up reader view to our application’s online search features and add value to them.
Aspect: How reader view styles should be specified
-
Alternative 1 (current choice): Hard-code reader view styles in the app.
-
Pros: Easy to implement, more control over user experience.
-
Cons: Users may not like the hard-coded reader view styles.
-
-
Alternative 2: Let users add custom stylesheets.
-
Pros: Gives users customization options.
-
Cons: Difficult to implement, stylesheets still need to be based on Bootstrap.
-
-
Why current choice:
-
It is a case of diminishing returns. It is not difficult to implement a design that allows us to add a few reader view styles for users to choose from, which gives them a lot more flexibility compared to not having any styles to choose from. However, making the design support custom user stylesheets would require much more effort while not giving users a lot more benefit. The current design makes it very simple for us to add another reader view style, in case many users demand a particular style. Nevertheless, this is a feature we can consider developing if there is demand for it.
Autofill missing title or description when adding a link
When adding a link using the add command, users only need to specify the URL field.
If the Title or Description field is not specified, they are automatically filled.
This makes adding links much faster and more convenient for users.
Current Implementation
Autofill-related code lies in the EntryAutofill utility class.
The constructor takes in the original Title and Description,
and there are methods to parse URL and HTML in order to extract replacement candidates,
as well as to get the best Title and Description candidates.
The fallback is a default Title and Description guaranteed to work.
The first attempt to find replacement candidates is by parsing just the URL.
This will work even if there is no Internet access, whereas the following attempts require Internet access.
The next attempt is by using the Jsoup library to parse the raw HTML into a Document object and obtain information likely to be present,
and the last attempt is by using the Readability4J library to process the Document object and extract metadata.
In this way, the last successful attempt to replace Title and Description becomes their current best replacement candidate.
Since we cascade from the last choice to the first choice for Title and Description separately,
by the end we have found the best possible replacement candidate for each of them given the circumstances.
However, replacement candidates are only chosen if the original Title and Description are empty,
so the original user input is still the first choice, followed by the best replacement candidates found.
This means that if both Title and Description are already specified by the user, AddCommand just adds the Entry to the Model.
Otherwise, AddCommand attempts to find replacement candidates for a missing Title or Description heuristically,
then updates the Entry with the best replacement and adds it to the Model.
Design Considerations
Aspect: Where autofill should be carried out
-
Alternative 1 (current choice): In
AddCommand-
Pros: The pattern of keeping logic within
Commandis followed by containing autofill logic withinAddCommand. -
Cons: Autofill only works for links added through
AddCommand.
-
-
Alternative 2: In
Model-
Pros: Autofill can work for any link added to
Model. -
Cons: The clean
Modelis polluted by including non-core logic like autofill.
-
-
Why current choice:
-
It is more important to follow the existing design conventions since it is not hard to include autofill logic in other areas using the
EntryAutofillutility class.
-
Aspect: How replacement candidates should be cascaded
-
Alternative 1: Check candidates are non-null and non-empty before replacing best candidate so far directly within
EntryAutofillmethods-
Pros: Simple to implement.
-
Cons: Messy and hard-to-read code.
-
-
Alternative 2 (current choice): Create and use a new
Candidateclass that generalizes this idea to any type and any function that checks for candidate validity-
Pros: Can be reused in many places, more elegant code.
-
Cons: Abstraction may be unnecessary.
-
-
Why current choice:
-
It is not hard to implement the
Candidateclass and the semantic beauty and elegance it affords is worth the small extra effort.
-